Table of Contents
This chapter describes in detail the way to use MayaVi for your data visualization.
It is important to understand the basic design of MayaVi before you use it. MayaVi is a data visualizer and the design reflects this. The basic design is simple and is described in this section.
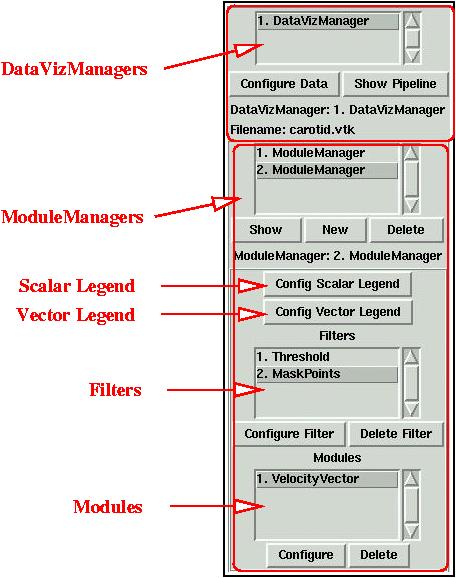
The control panel needs to be understood before one can do anything serious with MayaVi. This section describes the control panel in some detail.
Associated with each data file that is to be visualized is an object called a
DataVizManager. This object is responsible for the datafile and the entire visualization associated with that data file. EachDataVizManagerinstance is shown in the first list in the control panel.Each
DataVizManagercontrols a set ofModuleManagers. TheseModuleManagers are listed in the second list from the top.Each
ModuleManagercontrols set of two legends (one for scalar visualization and one for vector visualization), a collection ofFilters and a collection ofModules. Any number of Filters and Modules can be used.A
Filteris an object that filters out the data in some way or the other. A simple example is theExtractVectorNormfilter. This extracts the magnitude of the selected vector data field attribute for the data file. All modules that use this as an input will receive the vector magnitude as the scalar field data. The filters can be chosen from the menu. EachModuleManagercan have as many filters as are required. When multiple filters are used, it is important to note that each filter sends its data to the next filter in sequence. This could be problematic in some situations. Lets say there is a structured grid object and that needs to be subsampled. We can use theExtractGridfilter and then display aGridPlane. Now we want to show contours but this time we want to threshold the contours based on input scalars so we use theThresholdfilter. If we put theThresholdfilter in the same ModuleManager, the grid will disappear since theThresholdoutput is an unstructured grid. So to handle this we create a newModuleManager(click the button) and add theThresholdfilter in thatModuleManager. Put all the modules that use this filter in thatModuleManager.A
Moduleis an object that actually visualizes the data. There are a large number of Modules that can be used and these are also available from the menu. EachModuleManagercan have as many modules as are required.
Although the above sounds complex, it really is not. It may just take a little getting used to before you are completely comfortable with it. The following figure illustrates the above and clarifies matters.
 |
The Control Panel
If you have multiple DataVizManagers and want
to see the ModuleManagers of one of them then
you either double click on the appropriate manager or single click on
the manager and click on the for
the DataVizManagers and on the
for the
ModuleManagers.
The other GUI buttons and features are all rather self explanatory. There are only a few points that need to be made in order to make this description complete:
The creation and deletion of a
DataVizManageris controlled via the menu. The open menu items will create a newDataVizManagerand the menu item will close the selectedDataVizManagerand all itsModuleManagers. The menu item will close all theDataVizManagers.The addition and deletion of
ModuleManagers, can be done using the and buttons in the control panel.Filters andModules can be added from the menu and the corresponding and the sub menus. They can be deleted from the control panel.Filters andModules can be configured by either double clicking on the corresponding item or by selecting the item and clicking on the button.